import moment from 'moment';          // default import from npm
import { HTTP } from 'meteor/http'; // named import from Atmosphere​import statements compile to CommonJS require syntax. However, as a convention we encourage you to use import.require directly. One notable example is when requiring client or server-only code from a common file. As imports must be at the top-level scope, you may not place them within an if statement, so you’ll need to write code like:if (Meteor.isClient) {
require('./client-only-file.js');
}require() (where the name being required can change at runtime) cannot be analyzed correctly and may result in broken client bundles.require from an ES2015 module with a default export, you can grab the export with require("package").default.import and export statements natively. Make sure you are using the latest version of the CoffeeScript package in your project to get this support. New projects created today will get this version with meteor add coffeescript. Make sure you don’t forget to include the ecmascript and modules packages : meteor add ecmascript. (The modules package is implied by ecmascript.)import { Meteor } from 'meteor/meteor'
import SimpleSchema from 'simpl-schema'
import { Lists } from './lists.coffee'{
"meteor": {
"mainModule": {
"client": "client/main.js",
"server": "server/main.js"
}
}
}meteor.mainModule, the meteor section of package.json may also specify meteor.testModule to control which test modules are loaded by meteor test or meteor test --full-app:{
"meteor": {
"mainModule": {
"client": "client/main.js",
"server": "server/main.js"
},
"testModule": "tests.js"
}
}{
"meteor": {
"mainModule": {
"client": "client/main.js",
"server": "server/main.js"
},
"testModule": {
"client": "client/tests.js",
"server": "server/tests.js"
}
}
}--full-app option.Meteor.isAppTest.meteor.testModule can import other test modules at runtime, so you can still distribute test files across your codebase; just make sure you import the ones you want to run.{
"meteor": {
"mainModule": {
"client": false,
"server": "server/main.js"
}
}
}api.use('modules') or api.use('ecmascript') in the Package.onUse section of your package.js file, you can also use a new API called api.mainModule to specify the main entry point for your package :Package.describe({
name: 'my-modular-package'
});
Npm.depends({
moment: '2.10.6'
});
Package.onUse((api) => {
api.use('modules');
api.mainModule('server.js', 'server');
api.mainModule('client.js', 'client');
api.export('Foo');
});server.js and client.js can import other files from the package source directory, even if those files have not been added using the api.addFiles function.api.mainModule, the exports of the main module are exposed globally as Package['my-modular-package'], along with any symbols exported by api.export, and thus become available to any code that imports the package. In other words, the main module gets to decide what value of Foo will be exported by api.export, as well as providing other properties that can be explicitly imported from the package:// In an application that uses 'my-modular-package':
import { Foo as ExplicitFoo, bar } from 'meteor/my-modular-package';
console.log(Foo); // Auto-imported because of `api.export`.
console.log(ExplicitFoo); // Explicitly imported, but identical to `Foo`.
console.log(bar); // Exported by server.js or client.js, but not auto-imported.'meteor/my-modular-package', not from 'my-modular-package'. Meteor package identifier strings must include the prefix meteor/... to disambiguate them from npm packages.modules package, and the package Npm.depends on the “moment” npm package, modules within the package can import moment from 'moment' on both the client and the server. This is great news, because previous versions of Meteor allowed npm imports only on the server, via Npm.require.Package.onUse(function (api) {
api.mainModule("client.js", "client", { lazy: true });
});client.js module will not be evaluated during app startup unless/until another module imports it, and will not even be included in the client bundle if no importing code is found.exportedPackageMethod, simply :import { exportedPackageMethod } from "meteor/<package name>";lazy main modules cannot use api.export to export global symbols to other packages/apps. Also, prior to Meteor 1.4.4.2 it is neccessary to explicitly name the file containing the module: import "meteor/<package name>/client.js".a.js needs something defined by b.js, then a.js can simply import that value from b.js:// a.js
import { bThing } from './b';
console.log(bThing, 'in a.js');// b.js
export var bThing = 'a thing defined in b.js';
console.log(bThing, 'in b.js');import anything from another module, but you still want to be sure the other module gets evaluated first. In such situations, you can use an even simpler import syntax:// c.js
import './a';
console.log('in c.js');console.log calls will always be :console.log(bThing, 'in b.js');
console.log(bThing, 'in a.js');
console.log('in c.js');import { Name } from 'meteor/package' syntax before using them. For instance :import { Meteor } from 'meteor/meteor';
import { EJSON } from 'meteor/ejson';main. are loaded lastlib/ directory are loaded next nav.html
main.html
client/lib/methods.js
client/lib/styles.js
lib/feature/styles.js
lib/collections.js
client/feature-y.js
feature-x.js
client/main.js​
main.html is loaded second because HTML templates are always loaded first, even if it begins with main., since rule 1 has priority over rule 2. However, it will be loaded after nav.html because rule 2 has priority over rule 5.client/lib/styles.js and lib/feature/styles.js have identical load order up to rule 4; however, since client comes before lib alphabetically, it will be loaded first.imports/ is not loaded anywhere and files must be imported using import.node_modules/ is not loaded anywhere. node.js packages installed into node_modules directories must be imported using import or by using Npm.depends in package.js.client/ is not loaded on the server. Similar to wrapping your code in if (Meteor.isClient) { ... }. All files loaded on the client are automatically concatenated and minified when in production mode. In development mode, JavaScript and CSS files are not minified, to make debugging easier. CSS files are still combined into a single file for consistency between production and development, because changing the CSS file’s URL affects how URLs in it are processed.<head>, <body>, and <template>. The head and body sections are separately concatenated into a single head and body, which are transmitted to the client on initial page load.server/ is not loaded on the client. Similar to wrapping your code in if (Meteor.isServer) { ... }, except the client never even receives the code. Any sensitive code that you don’t want served to the client, such as code containing passwords or authentication mechanisms, should be kept in the server/ directory.Node.js server instance. In Meteor, your server code runs in a single thread per request, not in the asynchronous callback style typical of Node.public/ are served as-is to the client. When referencing these assets, do not include public/ in the URL, write the URL as if they were all in the top level. For example, reference public/bg.png as <img src='/bg.png' />. This is the best place for favicon.ico, robots.txt, and similar files.private/ are only accessible from server code and can be loaded via the Assets API. This can be used for private data files and any files that are in your project directory that you don’t want to be accessible from the outside.import to control when files are loaded.tests/ is not loaded anywhere. Use this for any test code you want to run using a test runner outside of Meteor’s built-in test tools.Files/directories whose names start with a dot, like .meteor and .gitpackages/ : Used for local packagescordova-build-override/ : Used for advanced mobile build customizationsprograms : For legacy reasonshead, body and template. Head and body tag has same function as in regular HTML, but template tag is used to connect HTML to JavaScript.<head>
<title> </title>
</head>
<body>
</body>
<template name = "">
</template>if (Meteor.isClient) {
var ejsonDate = '{"$date": 1455029631493}';
var myDate = EJSON.parse(ejsonDate);
console.log(myDate);
}Tracker.autorun() method is used for tracking on session.var data = 0
Session.set('sessionData', data);
Tracker.autorun(function () {
var sessionValue = Session.get('sessionData');
console.log(sessionValue)
});
Template.myTemplate.events({
'click #myButton': function() {
Session.set('sessionData', data++);
}
});Session.set() method. Once the session data is set, it can return using Session.get() method. update logic” in your app that listens for data changes and manipulates the DOM. meteor npm install meteor-node-stubs@1.2.1meteor remove juliancwirko:postcss
meteor add standard-minifier-cssjuliancwirko:postcss :excludedPackages PostCSS option was renamed to excludedMeteorPackages.import.css extension are not treated speciallyTailwindCSS 3.x. These minifiers have been updated and tested with TailwindCSS 3:juliancwirko:postcss, starting with version 2.1.0standard-minifier-cssaccounts-2fa is a new package that enables two-factor authentication for accounts-password and accounts-passwordless.accounts-password or accounts-passwordless you can start using the new functions provided from 2FA package.Todos = new Mongo.Collection('todos');// This line won't complete until the insert is done
Todos.insert({_id: 'my-todo'});
// So this line will return something
const todo = Todos.findOne({_id: 'my-todo'});
// Look ma, no callbacks!
console.log(todo);Todos = new Mongo.Collection('todos');// This line is changing an in-memory Minimongo data structure
Todos.insert({_id: 'my-todo'});
// And this line is querying it
const todo = Todos.findOne({_id: 'my-todo'});
// So this happens right away!
console.log(todo);SelectedTodos = new Mongo.Collection(null);
SelectedTodos = new Mongo.Collection('selectedtodos', {connection: null});Lists.helpers({
todos() {
return Todos.find({listId: this._id}, {sort: {createdAt: -1}});
}
});const list = Lists.findOne();
console.log(`The first list has ${list.todos().count()} todos`);dburles:collection-helpers package to easily attach such methods (or “helpers”) to documents. For instance:Lists.helpers({
// A list is considered to be private if it has a userId set
isPrivate() {
return !!this.userId;
}
});.isPrivate() function available :const list = Lists.findOne();
if (list.isPrivate()) {
console.log('The first list is private!');
}Session.set(key, value);meteor add sessionmeteor create foldernamecd foldernameimport { Session } from 'meteor/session'Step to Run Application : Run the application from the root directory of the project, using the following command.
meteor
Example : This is the basic example that shows how to use the Sessions component.
Main.html :
<head>
    <title>FreeTimeLearn</title>
</head>
 <body>
    <div>
        {{> employee}}
    </div>
</body>
<template name="employee">
    <h1 class="heading">FreeTimeLearn</h1>
    <p>
        Session provides a global object that may
        be used to hold an arbitrary set of key-value pairs.
    </p>
</template>
Main.js :
import { Session } from 'meteor/session';
import './main.html';
var emp = {
    FirstName: "John",
    LastName: "Smith",
    Age: 10,
    Designation: "System Architecture"
}
Session.set('data', emp);
var display = Session.get('data');
console.log(display);
Output : 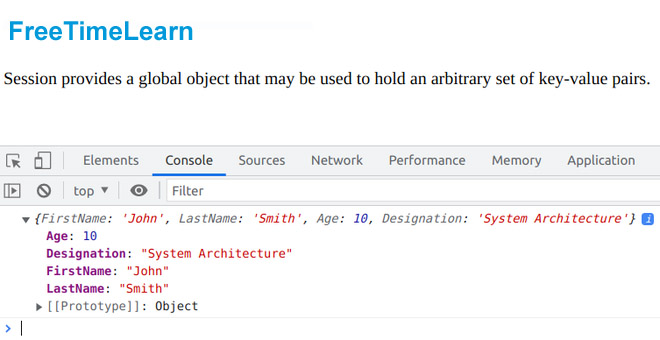
Source : meteor
