ml5.js, we can load the data, create model, train it and run the model.const myClassifier = await ml5.imageClassifier(‘MobileNet’);const results = await myClassifier.classify(myCatImage);// An array of objects with “label” and “confidence”
// [ { label: ‘cat’, confidence: 0.74 } ]
console.log(results);ml5.js in three simple steps.p5.js, a JavaScript library for creating graphics and animations in the browser, which makes it easier to get inputs from webcam or microphones and also to show the outputs with canvas, image or audio.// Initialize the Image Classifier method with MobileNet. A callback needs to be passed.
let classifier;
// A variable to hold the image we want to classify
let img;preload() function to load our imageClassifier model and our bird image before running the rest of our code. Since machine learning models can be large, it can take time to load. We use preload() in this case to make sure our imageClassifier and image are ready to go before we can apply the image classification in the next step.function preload() {
classifier = ml5.imageClassifier('MobileNet');
img = loadImage('images/bird.png');
}
p5.js we use the setup() function for everything in our program that just runs once. In our program, we use the setup() function to:.classify() on our classifier to classify our image.classify() function takes two parameters: 1. the image you want to classify, and 2. a callback function called gotResult. Let's look at what gotResult does.function setup() {
createCanvas(400, 400);
classifier.classify(img, gotResult);
image(img, 0, 0);
}gotResult() function takes two parameters: 1. error, and 2. results. These get passed along to gotResult() when the .classify() function finishes classifying the image. If there is an error, then an error will be logged. If our classifier manages to recognize the content of the image, then a result will be returned.nf() function is a p5 function that formats our number to a nicer string.// A function to run when we get any errors and the results
function gotResult(error, results) {
// Display error in the console
if (error) {
console.error(error);
} else {
// The results are in an array ordered by confidence.
console.log(results);
createDiv(`Label: ${results[0].label}`);
createDiv(`Confidence: ${nf(results[0].confidence, 0, 2)}`);
}
}ml5.js is trying to make machine learning more approachable. Try using different images and seeing what kinds of things get returned.ml5.js examples at our Github page: ml5-library. If you start to explore these examples you can see how the different ml5 functions are used to accomplish different outcomes. We try our best to keep the examples as simple as possible so you can easily start to build your ideas on top of them.p5.js, callbacks are passed as arguments to functions that often perform some asynchronous operation. For example, p5.js defines the loadJSON() function as the following:loadJSON('http//example.com/data.json', (results) => {
// Do something with the results
});p5.js are given as the only argument to the function. There is no error argument in the callback.ml5.js, on the other hand, uses a pattern referred to as an error-first callback :imageClassifier() method, you will need to construct it in the following way:// Pass a callback function to constructor
const classifier = ml5.imageClassifier('MobileNet', (err, model) => {
console.log('Model Loaded!');
});
// Make a prediction with the selected image and pass a callback function with two arguments
classifier.predict(image, (err, results) => {
// Check for errors. If no errors, then do something with the results
});ml5.js also supports Promises. If no callback is provided to any asynchronous function then a Promise is returned.// No callback needs to be passed to use Promises.
ml5
.imageClassifier('MobileNet')
.then(classifier => classifier.predict(image))
.then((results) => {
// Do something with the results
});ml5.neuralNetwork. Collect data to train your neural network or use existing data to train your neural network in real-time. Once it is trained, your neural network can do classification or regression tasks. ml5.neuralNetwork look something like : // Step 1: load data or create some data
const data = [
{r:255, g:0, b:0, color:'red-ish'},
{r:254, g:0, b:0, color:'red-ish'},
{r:253, g:0, b:0, color:'red-ish'},
{r:0, g:255, b:0, color:'green-ish'},
{r:0, g:254, b:0, color:'green-ish'},
{r:0, g:253, b:0, color:'green-ish'},
{r:0, g:0, b:255, color:'blue-ish'},
{r:0, g:0, b:254, color:'blue-ish'},
{r:0, g:0, b:253, color:'blue-ish'}
];
// Step 2: set your neural network options
const options = {
task: 'classification',
debug: true
}
// Step 3: initialize your neural network
const nn = ml5.neuralNetwork(options);
// Step 4: add data to the neural network
data.forEach(item => {
const inputs = {
r: item.r,
g: item.g,
b: item.b
};
const output = {
color: item.color
};
nn.addData(inputs, output);
});
// Step 5: normalize your data;
nn.normalizeData();
// Step 6: train your neural network
const trainingOptions = {
epochs: 32,
batchSize: 12
}
nn.train(trainingOptions, finishedTraining);
// Step 7: use the trained model
function finishedTraining(){
classify();
}
// Step 8: make a classification
function classify(){
const input = {
r: 255,
g: 0,
b: 0
}
nn.classify(input, handleResults);
}
// Step 9: define a function to handle the results of your classification
function handleResults(error, result) {
if(error){
console.error(error);
return;
}
console.log(result); // {label: 'red', confidence: 0.8};
}data/colorData.json"{
"entries": [
{"r":255, "g":0, "b":0, "color":"red-ish"},
{"r":254, "g":0, "b":0, "color":"red-ish"},
{"r":253, "g":0, "b":0, "color":"red-ish"},
{"r":0, "g":255, "b":0, "color":"green-ish"},
{"r":0, "g":254, "b":0, "color":"green-ish"},
{"r":0, "g":253, "b":0, "color":"green-ish"},
{"r":0, "g":0, "b":255, "color":"blue-ish"},
{"r":0, "g":0, "b":254, "color":"blue-ish"},
{"r":0, "g":0, "b":253, "color":"blue-ish"}
]
}script.js"// Step 1: set your neural network options
const options = {
dataUrl: "data/colorData.json",
task: 'classification',
inputs:['r', 'g', 'b'],
outputs:['color'],
debug: true
}
// Step 2: initialize your neural network
const nn = ml5.neuralNetwork(options, dataLoaded);
// Step 3: normalize data and train the model
function dataLoaded(){
nn.normalizeData();
trainModel();
}
// Step 4: train the model
function trainModel(){
const trainingOptions = {
epochs: 32,
batchSize: 12
}
nn.train(trainingOptions, finishedTraining);
}
// Step 5: use the trained model
function finishedTraining(){
classify();
}
// Step 6: make a classification
function classify(){
const input = {
r: 255,
g: 0,
b: 0
}
nn.classify(input, handleResults);
}
// Step 7: define a function to handle the results of your classification
function handleResults(error, result) {
if(error){
console.error(error);
return;
}
console.log(result); // {label: 'red', confidence: 0.8};
}const options = {
inputs: 1,
outputs: 1,
task: 'regression'
}
const nn = ml5.neuralNetwork(options)const options = {
dataUrl: 'weather.csv',
inputs: ['avg_temperature', 'humidity'],
outputs: ['rained'],
task: 'classification'
}
const nn = ml5.neuralNetwork(options, modelLoaded)/**
The weather json looks something like:
{"data": [
{"xs": {"avg_temperature":20, "humidity": 0.2}, "ys": {"rained": "no"}},
{"xs": {"avg_temperature":30, "humidity": 0.9}, "ys": {"rained": "yes"}}
] }
* */
const options = {
dataUrl: 'weather.json',
inputs: ['avg_temperature', 'humidity'],
outputs: ['rained'],
task: 'classification'
}
const nn = ml5.neuralNetwork(options, modelLoaded)const options = {
inputs: ['x', 'y'],
outputs: ['label'],
task: 'classification',
};
const nn = ml5.neuralNetwork(options);imageClassification.const IMAGE_WIDTH = 64;
const IMAGE_HEIGHT = 64;
const IMAGE_CHANNELS = 4;
const options = {
task: 'imageClassification',
inputs:[IMAGE_WIDTH, IMAGE_HEIGHT, IMAGE_CHANNELS],
outputs: ['label']
}
const nn = ml5.neuralNetwork(options);ml5.neuralNetwork. Below we cover the possibilities :regression' | 'classification') and then create the neuralNetwork. You will have to add data later on, but ml5 will figure the inputs and outputs based on the data your add.const options = {
task: 'regression' // or 'classification'
}
const nn = ml5.neuralNetwork(options)regression' | 'classification') and then create the neuralNetwork. To be more specific about your inputs and outputs, you can also define the names of the labels for your inputs and outputs as arrays OR the number of inputs and outputs. You will have to add data later on. Note that if you add data as JSON, your JSON Keys should match those defined in the options. If you add data as arrays, make sure the order you add your data match those given in the options.const options = {
task: 'classification' // or 'regression'
inputs:['r', 'g','b'],
outputs: ['color']
}
const nn = ml5.neuralNetwork(options)const options = {
task: 'classification' // or 'regression'
inputs: 3, // r, g, b
outputs: 2 // red-ish, blue-ish
}
const nn = ml5.neuralNetwork(options)ml5.neuralNetwork specifying an external url to some data structured as a CSV or a JSON file. If you pass in data as part of the options, you will need to provide a callback function that will be called when your data has finished loading. Furthermore, you will need to specify which properties in the data that ml5.neuralNetwork will use for inputs and outputs.const options = {
dataUrl: 'data/colorData.csv'
task: 'classification' // or 'regression'
inputs: ['r', 'g','b'], // r, g, b
outputs: ['color'] // red-ish, blue-ish
}
const nn = ml5.neuralNetwork(options, dataLoaded)
function dataLoaded(){
// continue on your neural network journey
nn.normalizeData();
// ...
}ml5.neuralNetwork.save() then you can load in the model, the weights, and the metadata.const options = {
task: 'classification' // or 'regression'
}
const nn = ml5.neuralNetwork(options);
const modelDetails = {
model: 'model/model.json',
metadata: 'model/model_meta.json',
weights: 'model/model.weights.bin'
}
nn.load(modelDetails, modelLoaded)
function modelLoaded(){
// continue on your neural network journey
// use nn.classify() for classifications or nn.predict() for regressions
}ml5.neuralNetwork by setting the task:"imageClassification".const IMAGE_WIDTH = 64;
const IMAGE_HEIGHT = 64;
const IMAGE_CHANNELS = 4;
const options = {
task: 'imageClassification',
inputs:[IMAGE_WIDTH, IMAGE_HEIGHT, IMAGE_CHANNELS],
outputs: ['label']
}
const nn = ml5.neuralNetwork(options);imageClassificaiton tasks.classification layers :layers:[
{
type: 'dense',
units: this.options.hiddenUnits,
activation: 'relu',
},
{
type: 'dense',
activation: 'softmax',
},
];regression layers :layers: [
{
type: 'dense',
units: this.options.hiddenUnits,
activation: 'relu',
},
{
type: 'dense',
activation: 'sigmoid',
},
];imageClassification layers :layers = [
{
type: 'conv2d',
filters: 8,
kernelSize: 5,
strides: 1,
activation: 'relu',
kernelInitializer: 'varianceScaling',
},
{
type: 'maxPooling2d',
poolSize: [2, 2],
strides: [2, 2],
},
{
type: 'conv2d',
filters: 16,
kernelSize: 5,
strides: 1,
activation: 'relu',
kernelInitializer: 'varianceScaling',
},
{
type: 'maxPooling2d',
poolSize: [2, 2],
strides: [2, 2],
},
{
type: 'flatten',
},
{
type: 'dense',
kernelInitializer: 'varianceScaling',
activation: 'softmax',
},
];ml5.neuralNetwork on initialization.const options = {
debug: true,
task: 'classification',
layers: [
{
type: 'dense',
units: 16,
activation: 'relu'
},
{
type: 'dense',
units: 16,
activation: 'sigmoid'
},
{
type: 'dense',
activation: 'sigmoid'
}
]
};
const nn = ml5.neuralNetwork(options);| property | description | datatype |
|---|---|---|
.callback |
the callback to be called after data is loaded on initialization | function |
.options |
the options for how the neuralNetwork should be configured on initialization | object |
.neuralNetwork |
the neuralNetwork class where all of the tensorflow.js model operations are organized |
class |
.neuralNetworkData |
the neuralNetworkData class where all of the data handling operations are organized |
class |
.neuralNetworkVis |
the neuralNetworkVis class where all of the tf-vis operations are organized |
class |
.data |
The property that stores all of the training data after .train() is called |
class |
.ready |
set to true if the model is loaded and ready, false if it is not. | boolean |
| method | description |
|---|---|
.addData() |
adds data to the neuralNetworkData.data.raw array |
.normalizeData() |
normalizes the data stored in neuralNetworkData.data.raw and stores the normalized values in the neuralNetwork.data.training array |
.train() |
uses the data in the neuralNetwork.data.training array to train your model |
.predict() |
for regression tasks, allows you to make a prediction based on an input array or JSON object. |
.predictMultiple() |
for regression tasks, allows you to make a prediction based on an input array of arrays or array of JSON objects. |
.classify() |
for classification tasks, allows you to make a classification based on an input array or JSON object. |
.classifyMultiple() |
for classification tasks, allows you to make classifications based on an input array of arrays or array of JSON objects. |
.saveData() |
allows you to save your data out from the neuralNetworkData.data.raw array |
.loadData() |
allows you to load data previously saved from the .saveData() function |
.save() |
allows you to save the trained model |
.load() |
allows you to load a trained model |
ml5.imageClassifier() is a method to create an object that classifies an image using a pre-trained model.// Initialize the Image Classifier method with MobileNet
const classifier = ml5.imageClassifier('MobileNet', modelLoaded);
// When the model is loaded
function modelLoaded() {
console.log('Model Loaded!');
}
// Make a prediction with a selected image
classifier.classify(document.getElementById('image'), (err, results) => {
console.log(results);
});const classifier = ml5.imageClassifier(model, ?video, ?options, ?callback);mobilenet :const classifier = ml5.imageClassifier('MobileNet', modelReady);Darknet :const classifier = ml5.imageClassifier('Darknet', modelReady);DoodleNet :const classifier = ml5.imageClassifier('DoodleNet', modelReady);const classifier = ml5.imageClassifier('path/to/custom/model.json', modelReady);{
version: 1,
alpha: 1.0,
topk: 3,
};.classify()classifier.classify(input, ?numberOfClasses, ?callback);classifier.classify(?numberOfClasses , ?callback);.segment(). Likely a function to do something with the segmented image.const video = document.getElementById('video');
// Create a new poseNet method
const poseNet = ml5.poseNet(video, modelLoaded);
// When the model is loaded
function modelLoaded() {
console.log('Model Loaded!');
}
// Listen to new 'pose' events
poseNet.on('pose', (results) => {
poses = results;
});// Initialize with video, type and callback
const poseNet = ml5.poseNet(?video, ?type, ?callback);
// OR Initialize with video, options and callback
const poseNet = ml5.poseNet(?video, ?options, ?callback);
// OR Initialize WITHOUT video. Just options and callback here
const poseNet = ml5.poseNet(?callback, ?options);{
architecture: 'MobileNetV1',
imageScaleFactor: 0.3,
outputStride: 16,
flipHorizontal: false,
minConfidence: 0.5,
maxPoseDetections: 5,
scoreThreshold: 0.5,
nmsRadius: 20,
detectionType: 'multiple',
inputResolution: 513,
multiplier: 0.75,
quantBytes: 2,
};TensorFlow.js. In computer vision, image segmentation refers to the technique of grouping pixels in an image into semantic areas typically to locate objects and boundaries. The BodyPix model is trained to do this for a person and twenty-four body parts (parts such as the left hand, front right lower leg, or back torso). In other words, BodyPix can classify the pixels of an image into two categories: 1) pixels that represent a person and 2) pixels that represent background. It can further classify pixels representing a person into any one of twenty-four body parts."const bodypix = ml5.bodyPix(modelReady);
function modelReady() {
// segment the image given
bodypix.segment(img, gotResults);
}
function gotResults(error, result) {
if (error) {
console.log(error);
return;
}
// log the result
console.log(result.backgroundMask);
}const bodyPix = new ml5.bodyPix(?video, ?options, ?callback);{
multiplier: 0.75, // 1.0, 0.75, or 0.50, 0.25
outputStride: 16, // 8, 16, or 32, default is 16
segmentationThreshold: 0.5, // 0 - 1, defaults to 0.5
palette: {
leftFace: {
id: 0,
color: [110, 64, 170],
},
rightFace: {
id: 1,
color: [106, 72, 183],
},
rightUpperLegFront: {
id: 2,
color: [100, 81, 196],
},
rightLowerLegBack: {
id: 3,
color: [92, 91, 206],
},
rightUpperLegBack: {
id: 4,
color: [84, 101, 214],
},
leftLowerLegFront: {
id: 5,
color: [75, 113, 221],
},
leftUpperLegFront: {
id: 6,
color: [66, 125, 224],
},
leftUpperLegBack: {
id: 7,
color: [56, 138, 226],
},
leftLowerLegBack: {
id: 8,
color: [48, 150, 224],
},
rightFeet: {
id: 9,
color: [40, 163, 220],
},
rightLowerLegFront: {
id: 10,
color: [33, 176, 214],
},
leftFeet: {
id: 11,
color: [29, 188, 205],
},
torsoFront: {
id: 12,
color: [26, 199, 194],
},
torsoBack: {
id: 13,
color: [26, 210, 182],
},
rightUpperArmFront: {
id: 14,
color: [28, 219, 169],
},
rightUpperArmBack: {
id: 15,
color: [33, 227, 155],
},
rightLowerArmBack: {
id: 16,
color: [41, 234, 141],
},
leftLowerArmFront: {
id: 17,
color: [51, 240, 128],
},
leftUpperArmFront: {
id: 18,
color: [64, 243, 116],
},
leftUpperArmBack: {
id: 19,
color: [79, 246, 105],
},
leftLowerArmBack: {
id: 20,
color: [96, 247, 97],
},
rightHand: {
id: 21,
color: [115, 246, 91],
},
rightLowerArmFront: {
id: 22,
color: [134, 245, 88],
},
leftHand: {
id: 23,
color: [155, 243, 88],
},
},
};​// load your model...
const uNet = ml5.uNet('face');
// assuming you have an HTMLVideo feed...
uNet.segment(video, gotResult);
function gotResult(error, result) {
// if there's an error return it
if (error) {
console.error(error);
return;
}
// log your result
console.log(result);
}const unet = ml5.uNet(model, ?callback);
let predictions = [];
const video = document.getElementById('video');

// Create a new handpose method
const handpose = ml5.handpose(video, modelLoaded);

// When the model is loaded
function modelLoaded() {
  console.log('Model Loaded!');
}

// Listen to new 'hand' events
handpose.on('hand', results => {
  predictions = results;
});const handpose = ml5.handpose(?video, ?options, ?callback);const options = {
flipHorizontal: false, // boolean value for if the video should be flipped, defaults to false
maxContinuousChecks: Infinity, // How many frames to go without running the bounding box detector. Defaults to infinity, but try a lower value if the detector is consistently producing bad predictions.
detectionConfidence: 0.8, // Threshold for discarding a prediction. Defaults to 0.8.
scoreThreshold: 0.75, // A threshold for removing multiple (likely duplicate) detections based on a "non-maximum suppression" algorithm. Defaults to 0.75
iouThreshold: 0.3, // A float representing the threshold for deciding whether boxes overlap too much in non-maximum suppression. Must be between [0, 1]. Defaults to 0.3.
}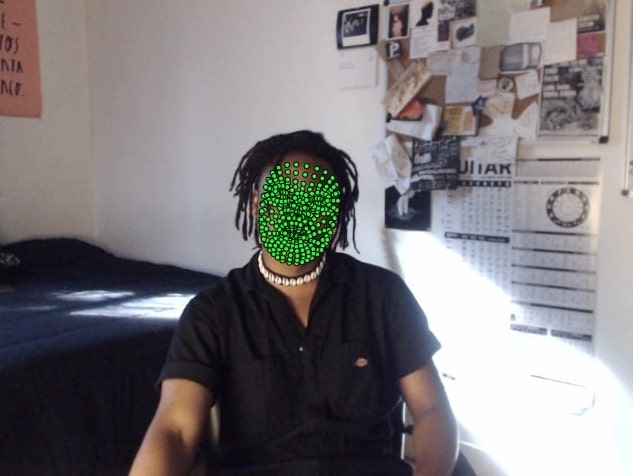
ml5.js Facemesh model is ported from the TensorFlow.js Facemesh implementation.let predictions = [];
const video = document.getElementById('video');
// Create a new facemesh method
const facemesh = ml5.facemesh(video, modelLoaded);
// When the model is loaded
function modelLoaded() {
console.log('Model Loaded!');
}
// Listen to new 'face' events
facemesh.on('face', results => {
predictions = results;
});const facemesh = ml5.facemesh(?video, ?options, ?callback);const options = {
flipHorizontal: false, // boolean value for if the video should be flipped, defaults to false
maxContinuousChecks: 5, // How many frames to go without running the bounding box detector. Only relevant if maxFaces > 1. Defaults to 5.
detectionConfidence: 0.9, // Threshold for discarding a prediction. Defaults to 0.9.
maxFaces: 10, // The maximum number of faces detected in the input. Should be set to the minimum number for performance. Defaults to 10.
scoreThreshold: 0.75, // A threshold for removing multiple (likely duplicate) detections based on a "non-maximum suppression" algorithm. Defaults to 0.75.
iouThreshold: 0.3, // A float representing the threshold for deciding whether boxes overlap too much in non-maximum suppression. Must be between [0, 1]. Defaults to 0.3.
}ml5.js has created an API to face-api.js that allows you to access face and face landmark detection.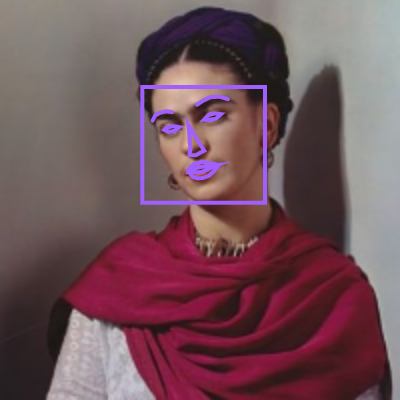
ml5.js implementation of face-api does not support expressions, age or gender estimation.const detectionOptions = {
withLandmarks: true,
withDescriptors: false,
};
// Initialize the magicFeature
const faceapi = ml5.faceApi(detectionOptions, modelLoaded);
// When the model is loaded
function modelLoaded() {
console.log('Model Loaded!');
// Make some sparkles
faceapi.detect(myImage, (err, results) => {
console.log(results);
});
}const faceapi = ml5.faceApi(videoOrOptionsOrCallback, optionsOrCallback?, callback?);{
withLandmarks: true,
withDescriptors: true,
minConfidence: 0.5,
MODEL_URLS: {
Mobilenetv1Model: 'https://raw.githubusercontent.com/ml5js/ml5-data-and-models/main/models/faceapi/ssd_mobilenetv1_model-weights_manifest.json',
FaceLandmarkModel: 'https://raw.githubusercontent.com/ml5js/ml5-data-and-models/main/models/faceapi/face_landmark_68_model-weights_manifest.json',
FaceLandmark68TinyNet: 'https://raw.githubusercontent.com/ml5js/ml5-data-and-models/main/models/faceapi/face_landmark_68_tiny_model-weights_manifest.json',
FaceRecognitionModel: 'https://raw.githubusercontent.com/ml5js/ml5-data-and-models/main/models/faceapi/face_recognition_model-weights_manifest.json',
},
};// Create a new Style Transfer Instance
const style = ml5.styleTransfer('data/myModel/', modelLoaded);
// When the model is loaded
function modelLoaded() {
console.log('Model Loaded!');
}
// Grab a img element and generate a new image.
style.transfer(document.getElementById("img"), function(error, result) {
img.src = result.src;
});const styletransfer = ml5.styleTransfer(model, ?callback);
// OR
const styletransfer = ml5.styleTransfer(model, ?video, ?callback);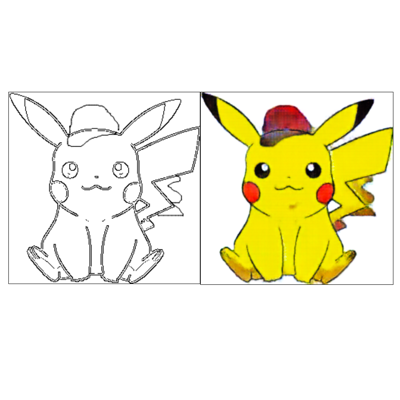
// Create a pix2pix model using a pre trained network
const pix2pix = ml5.pix2pix('models/customModel.pict', modelLoaded);

// When the model is loaded
function modelLoaded() {
  console.log('Model Loaded!');
}

// Transfer using a canvas
pix2pix.transfer(canvas, (err, result) => {
  console.log(result);
});const styleTransfer = ml5.pix2pix(model, ?callback);
// Create a new SketchRNN Instance
const model = ml5.sketchRNN('cat', modelReady);

// When the model is loaded
function modelReady() {
  console.log('SketchRNN Model Loaded!');
}
// Reset the model's current stat
model.reset();
// Generate a new stroke
model.generate(gotSketch);

function gotSketch(err, result) {
  // Do something with the result
}const sketchrnn = ml5.sketchRNN(model, ?callback);ml5.soundClassifier() allows you to classify audio. With the right pre-trained models, you can detect whether a certain noise was made (e.g. a clapping sound or a whistle) or a certain word was said (e.g. Up, Down, Yes, No). At this moment, with the ml5.soundClassifier(), you can use your own custom pre-trained speech commands or use the the "SpeechCommands18w" which can recognize "the ten digits from "zero" to "nine", "up", "down", "left", "right", "go", "stop", "yes", "no", as well as the additional categories of "unknown word" and "background noise"."// Options for the SpeechCommands18w model, the default probabilityThreshold is 0
const options = { probabilityThreshold: 0.7 };
const classifier = ml5.soundClassifier('SpeechCommands18w', options, modelReady);
function modelReady() {
// classify sound
classifier.classify(gotResult);
}
function gotResult(error, result) {
if (error) {
console.log(error);
return;
}
// log the result
console.log(result);
}const soundclassifier = ml5.soundClassifier(?model, ?options, ?callback)soundClassifier will start the default microphone.model.json. Here are some options:const classifier = ml5.soundClassifier('SpeechCommands18w', modelReady);const classifier = ml5.soundClassifier('path/to/model.json', modelReady);{
probabilityThreshold: 0.7, // probabilityThreshold is 0
};const audioContext = new AudioContext();
// const MicStream = MicStream
const pitch = ml5.pitchDetection(
'./model/',
audioContext,
MicStream,
modelLoaded,
);
// When the model is loaded
function modelLoaded() {
console.log('Model Loaded!');
}
pitch.getPitch((err, frequency) => {
console.log(frequency);
});const detector = ml5.pitchDetection(model, audioContext, stream, callback);// Create the character level generator with a pre trained model
const rnn = ml5.charRNN('models/bolaño/', modelLoaded);
// When the model is loaded
function modelLoaded() {
console.log('Model Loaded!');
}
// Generate content
rnn.generate({ seed: 'the meaning of pizza is' }, (err, results) => {
console.log(results);
});const charrnn = ml5.charRNN(model, ?callback);moviereviews', is trained using IMDB reviews that have been truncated to a maximum of 200 words, only the 20000 most used words in the reviews are used.// Create a new Sentiment method
const sentiment = ml5.sentiment('movieReviews', modelReady);
// When the model is loaded
function modelReady() {
// model is ready
console.log('Model Loaded!');
}
// make the prediction
const prediction = sentiment.predict(text);
console.log(prediction);const sentiment = ml5.sentiment(model, ?callback);moviereviews'. You can also use a path to a manifest.json file via a relative or absolute path.ml5.js. // Create a new word2vec method
const wordVectors = ml5.word2vec('data/wordvecs.json', modelLoaded);
// When the model is loaded
function modelLoaded() {
console.log('Model Loaded!');
}
// Find the closest word to 'rainbow'
wordVectors.nearest('rainbow', (err, results) => {
console.log(results);
});const word2vec = ml5.Word2Vec(model, ?callback);.flipImage() : Flips an image or video input horizontally and returns the flipped image. Handy for mirroring an image or video.const flippedImage = ml5.flipImage(input);ml5 with p5.js :<html>
<meta charset="UTF-8" />
<title>flipImage</title>
<script src="https://cdnjs.cloudflare.com/ajax/libs/p5.js/0.9.0/p5.min.js"></script>
<script src="https://cdnjs.cloudflare.com/ajax/libs/p5.js/0.9.0/addons/p5.dom.min.js"></script>
<script src="http://localhost:8080/ml5.js" type="text/javascript"></script>
<body>
<script>
let video;
function setup() {
createCanvas(640, 480);
video = createCapture(VIDEO);
video.size(640, 480);
video.hide();
}
function draw() {
const flippedVideo = ml5.flipImage(video);
image(flippedVideo, 0, 0, width, height);
}
</script>
</body>
</html>