void main() {
  for (int i = 0; i < 5; i++) {
    print('hello ${i + 1}');
  }
}​| Data Type | Example | Descriptions |
|---|---|---|
| String | String myName = 'javatpoint'; | It holds text. In this, you can use single or double quotation marks. Once you decide the quotation marks, you should have to be consistent with your choice. |
| num, int, double | int age = 25; double price = 125.50; |
The num data type stands for a number. Dart has two types of numbers:
|
| Boolean | bool var_name = true; Or bool var_name = false; |
It uses the bool keyword to represents the Boolean value true and false. |
| object | Person = Person() | Generally, everything in Dart is an object (e.g., Integer, String). But an object can also be more complex. |
flutter run` or `flutter build` commands. For example, to run the app in release mode, the command would be `flutter run --release`. build` method is a critical part of building widgets in Flutter. It is a required method that must be implemented in any widget that you create. The build method is called by the Flutter framework whenever the widget needs to be rendered on the screen.build` method is critical for building widgets in Flutter because it defines the UI and behavior of the widget, and it is called by the framework whenever the widget needs to be rendered on the screen. Key` is a unique identifier assigned to a widget that helps the framework identify and track the widget's state across rebuilds. Keys are important because they enable Flutter to efficiently update the UI when widgets are added, removed, or reordered in the widget tree.GlobalKey`, `UniqueKey`, `ObjectKey`, and `ValueKey`, each with their own use cases. Developers should choose the appropriate key type based on the needs of their app. runApp()` and `main()` are both important methods used in the initialization and running of a Flutter application, but they serve different purposes.`main()` : is the entry point of a Flutter app, just like in any other Dart application. It is a required method that starts the application and runs the code that initializes and sets up the app's environment. This includes setting up any global variables, importing libraries, and configuring the app's theme and layout.`runApp()` : is a method provided by the Flutter framework that takes a widget and makes it the root of the widget tree for the app. This method is typically called at the end of the `main()` method, after all the app's dependencies and configurations have been set up. http`, `shared_preferences`, and `provider`, are available through the Flutter package repository.pauses" until the operation is complete. This can be problematic when the operation takes a long time to complete, as it can freeze the app and make it unresponsive.await` keyword. | Hot Reload | Hot Restart |
|---|---|
| It works with a small r key on the terminal or commands prompt. | It mainly works with States value. |
| The hot reload feature allows us to quickly compile the newly added code in the file and sent them to Dart Virtual Machine (DVM). After DVM completes the updation, it immediately updates the UI of the app. | It allows developers to get a fully compiled application because it destroys the preserves State values and sets them to their defaults. On every Hot Restart, our app widget tree is completely rebuilt with the new typed code. |
| It helps to build UI, add new features, fix bugs, and make app development fast. | It takes more time than Hot Reload to compile and update the app. |
listen() from the Stream API. It has a way to respond to errors. We can create streams in many ways, but they can be used in the same way. Future<int> sumStream(Stream<int> stream) async {
var sum = 0;
await for (var value in stream) {
sum = sum + value;
}
return sum;
}replays" previous events to new subscribers. When a new subscription is added, it receives all the events that were added to the stream before the subscription was created. This type of Stream is typically used for caching or buffering data, allowing new subscribers to access previously processed data. hot reload" feature allows developers to see changes to the code immediately reflected in the app, making the development process faster and more efficient. React Native also has a hot reloading feature, but it can be more unpredictable and may require manual refreshes.crossAxisAlignment and mainAxisAlignment are used to control how a row and column widget aligns with their children depending on our choice. | ?? operator | ? Operator |
|---|---|
The "??" operator is used to evaluate and returns the value between two expressions. It can be used as below :expr1 ?? expr2This operator first checks the expression 1 and, if it is non-null, returns its value; otherwise, it will evaluate and returns the value of expression 2. |
The "?" operator is used to evaluate and returns the value between two expressions based on the given condition. It can be used as below :condition ? expr1 : expr2This operator first checks the condition, and if it is true, it will evaluate expr1 and returns its value (if the condition is matched). Otherwise, it evaluates and returns the value of expr2. |
createState() : When we build a new StatefulWidget, this one calls createState() right away and this override method must exist.initState() : It is the first method called after the Widget is created.This is our equivalent to onCreate() and viewDidLoad()didChangeDependencies() : This method is called immediately after initState() on the first time the widget is built.build() : This is called right after didChangeDependencies(). All the GUI is rendered here and will be called every single time the UI needs to be rendered.didUpdateWidget() : It’ll be called once the parent Widget did a change and needs to redraw the UI.deactivate() : Framework calls this method whenever it removes this State object from the treedispose() : It is called when this object and its State are removed from the tree permanently and will never build again. hot reload" feature allows developers to see changes to the code immediately reflected in the app, making the development process faster and more efficient. Swift does not have a similar feature.key" attribute in Flutter is used to uniquely identify a widget in the widget tree. Each widget in the tree must have a unique key, which is used by Flutter to efficiently update the UI when changes are made. int a; // a is initialized with null value.
a ??= 10;
print(a); // It will print 10. ​print(5 ?? 10); // It will print 5.
print(null ?? 10); // It will print 10. ​obj?.child?.child?.getter //The expression returns null if obj, child1, or child2 are null. If not, the getter is called and returned.​import 'package:flutter/foundation.dart' as Foundation; ​if (Foundation.kReleaseMode){ // is Release Mode ??
print('release mode');
} else {
print('debug mode');
} ​Future<String> fetchData() async {
// perform asynchronous operation
final response = await http.get('https://jsonplaceholder.typicode.com/posts/1');
// return result
return response.body;
}
class MyWidget extends StatelessWidget {
@override
Widget build(BuildContext context) {
return FutureBuilder<String>(
future: fetchData(),
builder: (BuildContext context, AsyncSnapshot<String> snapshot) {
if (snapshot.connectionState == ConnectionState.waiting) {
return CircularProgressIndicator();
} else if (snapshot.hasError) {
return Text('Error: ${snapshot.error}');
} else {
return Text('Data: ${snapshot.data}');
}
},
);
}
}​fetchData()` returns a Future that performs an HTTP GET request and returns the response body as a String. `MyWidget` uses a `FutureBuilder` widget to display the result of the `fetchData()` function. The `FutureBuilder` takes a `future` parameter, which is the Future that should be built, and a `builder` function that specifies how the widget should be updated as the Future progresses. builder` function returns a `CircularProgressIndicator` if the Future is still loading, a `Text` widget with an error message if the Future has completed with an error, and a `Text` widget with the loaded data if the Future has completed successfully. setState()` is a method that is used to update the state of a widget and trigger a rebuild of the widget tree. When you call `setState()`, Flutter schedules a rebuild of the widget tree, and when the rebuild happens, the widget's `build()` method is called again with the updated state.setState()` is important in Flutter because it allows you to update the user interface in response to user interactions, data changes, or other events. For example, you might use `setState()` to update the text of a button when the user clicks it, or to change the color of a widget based on some data that was fetched from a server.setState()` can be used to update the state of a widget :
class MyWidget extends StatefulWidget {
  @override
  _MyWidgetState createState() => _MyWidgetState();
}

class _MyWidgetState extends State<MyWidget> {
  int _counter = 0;

  void _incrementCounter() {
    setState(() {
      _counter++;
    });
  }

  @override
  Widget build(BuildContext context) {
    return Scaffold(
      appBar: AppBar(title: Text('Counter')),
      body: Center(
        child: Text('$_counter'),
      ),
      floatingActionButton: FloatingActionButton(
        onPressed: _incrementCounter,
        child: Icon(Icons.add),
      ),
    );
  }
}
In this example, `_counter` is a variable that holds the current value of the counter. The `_incrementCounter()` method is called when the user taps the floating action button, and it calls `setState()` to update the `_counter` variable and trigger a rebuild of the widget. The `build()` method returns a `Text` widget that displays the current value of `_counter`, and a `FloatingActionButton` that calls `_incrementCounter()` when pressed.
LayoutBuilder` is a widget that provides information about the size constraints of its parent widget. It takes a callback function as a parameter, and this function is called with a `BoxConstraints` object as an argument. The `BoxConstraints` object represents the constraints on the size and position of the child widget.LayoutBuilder` can be used :
class MyWidget extends StatelessWidget {
  @override
  Widget build(BuildContext context) {
    return Scaffold(
      appBar: AppBar(title: Text('LayoutBuilder')),
      body: Center(
        child: Container(
          width: 200,
          height: 200,
          color: Colors.blue,
          child: LayoutBuilder(
            builder: (BuildContext context, BoxConstraints constraints) {
              return Container(
                width: constraints.maxWidth * 0.5,
                height: constraints.maxHeight * 0.5,
                color: Colors.red,
              );
            },
          ),
        ),
      ),
    );
  }
}
In this example, `LayoutBuilder` is used to get the maximum width and height of the parent `Container` widget, and then use this information to size and position a child `Container` widget. The child `Container` widget is half the width and half the height of the parent `Container`, and is colored red to make it visible.
build method.const constructor, because this will tell Flutter that it doesn't need to rebuild the widget.child parameter. Image` widget is used to display an image on the screen. It supports different image formats such as JPEG, PNG, GIF, and WebP.Image` widget:class MyWidget extends StatelessWidget {
@override
Widget build(BuildContext context) {
return Scaffold(
appBar: AppBar(title: Text('Image Widget')),
body: Center(
child: Image.network(
'https://example.com/images/my_image.jpg',
width: 200,
height: 200,
fit: BoxFit.cover,
),
),
);
}
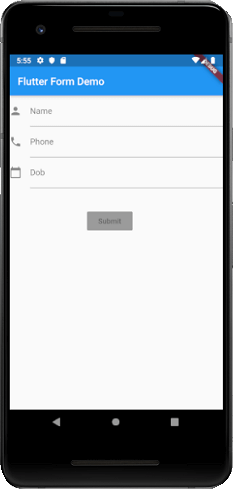
}​Image` widget is used to display an image from a network URL. The `fit` property is set to `BoxFit.cover` which means that the image will be scaled to cover the entire widget without distorting its aspect ratio. The `width` and `height` properties set the size of the image widget.Image` widgets such as `Image.asset` for loading images from the app's assets, `Image.file` for loading images from a file, and `Image.memory` for loading images from memory. MyCustomForm. Inside this class, we define a global key as _formKey. This key holds a FormState and can use to retrieve the form widget. Inside the build method of this class, we have added some custom style and use the TextFormField widget to provide the form fields such as name, phone number, date of birth, or just a normal field. Inside the TextFormField, we have used InputDecoration that provides the look and feel of your form properties such as borders, labels, icons, hint, styles, etc. Finally, we have added a button to submit the form.import 'package:flutter/material.dart';
void main() => runApp(MyApp());
class MyApp extends StatelessWidget {
@override
Widget build(BuildContext context) {
final appTitle = 'Flutter Form Demo';
return MaterialApp(
title: appTitle,
home: Scaffold(
appBar: AppBar(
title: Text(appTitle),
),
body: MyCustomForm(),
),
);
}
}
// Create a Form widget.
class MyCustomForm extends StatefulWidget {
@override
MyCustomFormState createState() {
return MyCustomFormState();
}
}
// Create a corresponding State class. This class holds data related to the form.
class MyCustomFormState extends State<MyCustomForm> {
// Create a global key that uniquely identifies the Form widget
// and allows validation of the form.
final _formKey = GlobalKey<FormState>();
@override
Widget build(BuildContext context) {
// Build a Form widget using the _formKey created above.
return Form(
key: _formKey,
child: Column(
crossAxisAlignment: CrossAxisAlignment.start,
children: <Widget>[
TextFormField(
decoration: const InputDecoration(
icon: const Icon(Icons.person),
hintText: 'Enter your name',
labelText: 'Name',
),
),
TextFormField(
decoration: const InputDecoration(
icon: const Icon(Icons.phone),
hintText: 'Enter a phone number',
labelText: 'Phone',
),
),
TextFormField(
decoration: const InputDecoration(
icon: const Icon(Icons.calendar_today),
hintText: 'Enter your date of birth',
labelText: 'Dob',
),
),
new Container(
padding: const EdgeInsets.only(left: 150.0, top: 40.0),
child: new RaisedButton(
child: const Text('Submit'),
onPressed: null,
)),
],
),
);
}
} 
MediaQuery` class provided by the Flutter framework. This class provides a number of static methods that you can use to retrieve information about the device's display, such as the width and height of the screen, the orientation of the device, and the device's pixel density.import 'package:flutter/material.dart';
class MyHomePage extends StatelessWidget {
@override
Widget build(BuildContext context) {
final mediaQuery = MediaQuery.of(context);
return Scaffold(
body: Container(
width: mediaQuery.size.width,
height: mediaQuery.size.height,
child: Center(
child: Text('Hello, world!'),
),
),
);
}
}In this example, we use the `MediaQuery.of()` method to retrieve a reference to the `MediaQueryData` object, which contains information about the device's display. We then use the `size` property of this object to set the width and height of a `Container` widget, which is used as the background for the page.
Scaffold` is a basic visual structure for a screen or page in an application. It provides a framework for implementing the basic visual elements of an app, such as the app bar, drawer, bottom navigation bar, and floating action button.Scaffold` widget is typically used as the top-level widget of a screen in a Flutter app. You can create a `Scaffold` widget by instantiating the `Scaffold` class, which is provided by the Flutter framework. Here's an example of how you might create a `Scaffold` widget:import 'package:flutter/material.dart';
class MyHomePage extends StatelessWidget {
@override
Widget build(BuildContext context) {
return Scaffold(
appBar: AppBar(
title: Text('My App'),
),
body: Center(
child: Text('Hello, world!'),
),
);
}
}​Scaffold` widget that contains an app bar with a title and a body that consists of a `Text` widget that displays the text "Hello, world!" in the center of the screen.Scaffold` widget provides a number of additional properties that you can use to customize the appearance and behavior of the app bar, drawer, bottom navigation bar, and floating action button, as well as other elements of the screen. These properties include `drawer`, `bottomNavigationBar`, `floatingActionButton`, `floatingActionButtonLocation`, and many more. async` keyword, and it typically returns a `Future` object, which represents the result of the asynchronous operation.Future<String> fetchData() async {
await Future.delayed(Duration(seconds: 2)); // Simulate a network request delay
return 'Data loaded successfully';
}​In this example, the `
fetchData()` function is marked with the `async` keyword, and it returns a `Future<String>` object. The `await` keyword is used to suspend the function while waiting for the `Future.delayed()` method to complete. Once the delay is over, the function returns a string that says "Data loaded successfully".FutureBuilder` and `StreamBuilder` to update the UI when asynchronous operations complete. For example, you could use the `FutureBuilder` widget to display a loading indicator while waiting for data to be fetched from a network, and then display the fetched data when it becomes available. StreamBuilder`, that can be used to listen to a Stream and rebuild the UI automatically when new data is received.import 'dart:async';
void main() {
final stream = Stream<int>.periodic(Duration(seconds: 1), (count) => count).take(5);
stream.listen((value) => print(value), onError: (error) => print(error), onDone: () => print('Done!'));
}​Stream.periodic()` constructor. The first argument to `Stream.periodic()` is a `Duration` object that specifies the interval between emitted values, and the second argument is a function that produces the values to emit. The `take()` method is used to limit the number of values emitted by the Stream to 5.listen()` method, which takes three optional parameters: a callback function to handle each emitted value, a callback function to handle errors, and a callback function to handle when the Stream is done emitting values.StreamBuilder` widget to build a UI that responds to real-time updates from a Stream. The `StreamBuilder` takes a Stream as input and rebuilds the UI automatically whenever a new event is emitted by the Stream. This allows us to create reactive UIs that update in real-time based on data changes. StatelessWidget` is a widget that represents an immutable part of the user interface. A `StatelessWidget` is created once when it is first inserted into the widget tree, and it does not change thereafter.StatelessWidget`s are used to display content that does not need to be updated dynamically. They are typically used for things like buttons, labels, icons, and other static UI elements that do not depend on external data or user input.StatelessWidget` is implemented by creating a new class that extends the `StatelessWidget` class and overriding the `build()` method. The `build()` method is where the widget's appearance is defined, using other widgets or primitive drawing operations. Here's an example:import 'package:flutter/material.dart';
class MyButton extends StatelessWidget {
final String text;
final VoidCallback onPressed;
MyButton({required this.text, required this.onPressed});
@override
Widget build(BuildContext context) {
return ElevatedButton(
onPressed: onPressed,
child: Text(text),
);
}
}​StatelessWidget` called `MyButton` that takes two required parameters: `text`, which specifies the text to display on the button, and `onPressed`, which specifies the function to call when the button is pressed.build()` method, we create an `ElevatedButton` widget that displays the `text` parameter and calls the `onPressed` function when the button is pressed.StatelessWidget`s are useful for creating simple, static UI elements that do not need to change over time. Since they are immutable, they are easy to reason about and optimize for performance. However, if you need to create a widget that can change over time, you should use a `StatefulWidget` instead. StatefulWidget` is a widget that has mutable state. The state of a `StatefulWidget` can change during the lifetime of the widget, based on user interactions, changes in external data sources, or other factors.StatefulWidget`s are used to represent UI elements that can change over time. Examples include text fields, sliders, progress indicators, and other UI elements that can be updated based on user input or changes in the underlying data.StatefulWidget` is implemented by creating a new class that extends the `StatefulWidget` class and overriding two methods: `createState()` and `build()`. The `createState()` method returns a new `State` object that will be used to manage the widget's state, while the `build()` method defines the widget's appearance.StatefulWidget` that displays a counter and increments it when a button is pressed:import 'package:flutter/material.dart';
class CounterWidget extends StatefulWidget {
@override
_CounterWidgetState createState() => _CounterWidgetState();
}
class _CounterWidgetState extends State<CounterWidget> {
int _counter = 0;
void _incrementCounter() {
setState(() {
_counter++;
});
}
@override
Widget build(BuildContext context) {
return Column(
children: [
Text('Counter: $_counter'),
ElevatedButton(
onPressed: _incrementCounter,
child: Text('Increment'),
),
],
);
}
}​StatefulWidget` called `CounterWidget`. The `createState()` method returns a new instance of the `_CounterWidgetState` class, which extends the `State` class and defines the mutable state for the widget._CounterWidgetState` class has a private field `_counter` that holds the current count, and a private method `_incrementCounter()` that updates the count and calls `setState()` to signal that the widget's state has changed.build()` method, we create a `Column` widget that displays the current count and an `ElevatedButton` widget that calls `_incrementCounter()` when it is pressed.StatefulWidget`s are useful for creating UI elements that can change over time. However, since they have mutable state, they can be more complex to reason about and optimize for performance compared to `StatelessWidget`s. It's important to use `StatefulWidget`s only when necessary and to manage their state carefully to ensure that the UI remains responsive and efficient. Navigator.push()` method.Navigator.pop()` method. When `pop()` is called, the current screen is removed from the stack and the previous screen becomes the topmost screen, and its contents become visible.push" adds a new screen to the navigation stack, while "pop" removes the current screen from the stack. push(), pushReplacement(), pushNamed(), pop(), popUntil(), and others.Navigator.push(
context,
MaterialPageRoute(builder: (context) => MyNewRoute()),
);​push()` method is used to add a new route to the stack. The `builder` argument specifies the widget to be displayed on the new route. pop()` method:Navigator.pop(context);​context` argument is required in both `push()` and `pop()` methods and is used to locate the Navigator widget in the widget tree. Navigator.push()` and `Navigator.pop()` are two methods of the Flutter `Navigator` class that are used for managing the navigation stack.Navigator.push()` is used to push a new route onto the stack, which becomes the current route and is displayed on the screen. This method takes two arguments: `BuildContext` and `Route`. The `BuildContext` is required and is used to locate the Navigator widget in the widget tree. The `Route` argument specifies the widget to be displayed on the new route.Navigator.pop()` is used to remove the current route from the stack and return to the previous route. This method also takes the `BuildContext` argument to locate the Navigator widget.Navigator.push()` is used to navigate to a new screen or page, while `Navigator.pop()` is used to go back to the previous screen or page. Navigator.push()` and `Navigator.pop()`:
// Push a new route onto the stack
Navigator.push(
  context,
  MaterialPageRoute(builder: (context) => MyNewRoute()),
);

// Pop the current route off the stack
Navigator.pop(context);
In this example, `MyNewRoute()` is a widget that represents the new screen to be displayed when `Navigator.push()` is called. When `Navigator.pop()` is called, it removes the current route from the stack and returns to the previous route.
Navigator` class that manages the app's navigation stack, and allows you to push and pop pages from the stack as necessary. The `Navigator` class can be accessed through the `Navigator.of(context)` method, which returns the nearest `Navigator` widget in the widget tree.var routes = {
'/home': (context) => HomeScreen(),
'/settings': (context) => SettingsScreen(),
'/profile': (context) => ProfileScreen(),
};​Navigator.pushNamed()` method, which takes the route name as an argument. For example :Navigator.pushNamed(context, '/settings');​SettingsScreen()` widget onto the navigation stack and display it on the screen.arguments` parameter of `Navigator.pushNamed()`, like this:Navigator.pushNamed(context, '/profile', arguments: {'userId': '123'});​ProfileScreen()` widget would receive a `Map` containing the `userId` argument when it is displayed. BuildContext` object is a fundamental part of the Flutter framework that provides information about the location of a widget in the widget tree hierarchy. It is a representation of the current context of a widget, which includes information about its location, theme, and dependencies.BuildContext` is used by Flutter to perform various tasks such as building the widget tree, handling state changes, and managing animations. It is passed down from the root of the widget tree to all of its child widgets, allowing them to access information about their parent widget and the overall application context.BuildContext` object is often used when creating widgets, especially when instantiating widgets that depend on the current context, such as `Scaffold`, `Theme`, `MediaQuery`, and `Navigator`. It is also used to perform various actions such as displaying dialogs, making network requests, and updating state. BuildContext` and `BuildContext context` are essentially the same thing. The `BuildContext` class represents the current context of a widget, which is a fundamental part of the Flutter framework that provides information about the location of a widget in the widget tree hierarchy. The `BuildContext` object is passed down from the root of the widget tree to all of its child widgets, allowing them to access information about their parent widget and the overall application context.BuildContext` and `BuildContext context` is in their naming convention. When defining a method or function that needs access to the `BuildContext` object, you can name the argument holding the `BuildContext` object whatever you like. It is common practice to use `BuildContext context` to indicate that the argument is holding a reference to a `BuildContext` object. BuildContext` object, you can use the following code :
class MyWidget extends StatelessWidget {
  @override
  Widget build(BuildContext context) {
    return Container(
      child: Text("Hello World"),
    );
  }
}
In the `build` method, the `context` argument holds the reference to the current `BuildContext` object. The argument could have been named anything, but `BuildContext context` is a commonly used convention in Flutter development.
hero" animated to the corresponding widget on another screen. During the animation, the widget is scaled up or down, and its position and size are interpolated to match the widget on the other screen.Here's an example of how to use a hero animation in Flutter:
class FirstScreen extends StatelessWidget {
@override
Widget build(BuildContext context) {
return Scaffold(
body: GestureDetector(
onTap: () {
Navigator.push(
context,
MaterialPageRoute(builder: (_) => SecondScreen()),
);
},
child: Hero(
tag: 'myHeroTag',
child: Image.asset('assets/my_image.png'),
),
),
);
}
}
class SecondScreen extends StatelessWidget {
@override
Widget build(BuildContext context) {
return Scaffold(
body: GestureDetector(
onTap: () {
Navigator.pop(context);
},
child: Center(
child: Hero(
tag: 'myHeroTag',
child: Image.asset('assets/my_image.png'),
),
),
),
);
}
}In this example, the hero widget is an image that is displayed on both the first and second screen. The `GestureDetector` widget is used to detect taps on the widget, and the `Navigator` widget is used to navigate between the two screens. The `Hero` widget is used to define the hero animation, and the tag is set to the same string on both screens. When the user taps on the image, the app navigates to the second screen, and the hero animation is automatically triggered, smoothly transitioning the image from the first to the second screen.
...Data_structure
Example:-
var a = [0,1,2,3,4];
var b = [6,7,8,9];
var c = [...a,5,...b];​

print(c); // prints: [0, 1, 2, 3, 4, 5, 6, 7, 8, 9]...?Data_structure
Exmaple :-
List<int> l1 = [1, 2, 3];
List<int> nullList = null;
List<int> result = [...l1, ...?nullList];
print(result); // prints: [1, 2, 3] ​InheritedWidget` is a special type of widget in Flutter that can be used to propagate data down the widget tree to its descendants. It is designed to optimize the performance of Flutter apps by minimizing the need to rebuild widgets unnecessarily.InheritedWidget` is essentially a widget that contains data that can be accessed by its descendants. When a widget is updated, Flutter first checks to see if any of the widget's ancestors are `InheritedWidgets`. If it finds one, it checks whether the data contained by the `InheritedWidget` has changed. If the data has changed, Flutter rebuilds the widgets below the `InheritedWidget` automatically.InheritedWidget` is used by creating a new subclass of the `InheritedWidget` class, overriding its `updateShouldNotify` method, and then wrapping the widgets that need access to the data with the `InheritedWidget` using its `of` method. By doing this, the descendants of the `InheritedWidget` can access its data directly, without the need for passing the data down manually through each widget.InheritedWidget` could be a localization widget that provides translated strings to all of its descendants. Since the localization data is unlikely to change frequently, it can be passed down to all descendants using `InheritedWidget`, avoiding unnecessary rebuilds of widgets that have not changed. 