The
form widget uses child widget
TextFormField to provide the users to enter the text field. This widget renders a material design text field and also allows us to display validation errors when they occur.
Let us create a form. First, create a Flutter project and replace the following code in the main.dart file. In this code snippet, we have created a custom class named
MyCustomForm. Inside this class, we define a global key
as _formKey. This key holds a FormState and can use to retrieve the form widget. Inside the build method of this class, we have added some custom style and use the TextFormField widget to provide the form fields such as name, phone number, date of birth, or just a normal field. Inside the TextFormField, we have used InputDecoration that provides the look and feel of your form properties such as borders, labels, icons, hint, styles, etc. Finally, we have added a button to submit the form.
import 'package:flutter/material.dart';

void main() => runApp(MyApp());

class MyApp extends StatelessWidget {
  @override
  Widget build(BuildContext context) {
    final appTitle = 'Flutter Form Demo';
    return MaterialApp(
      title: appTitle,
      home: Scaffold(
        appBar: AppBar(
          title: Text(appTitle),
        ),
        body: MyCustomForm(),
      ),
    );
  }
}
// Create a Form widget.
class MyCustomForm extends StatefulWidget {
  @override
  MyCustomFormState createState() {
    return MyCustomFormState();
  }
}
// Create a corresponding State class. This class holds data related to the form.
class MyCustomFormState extends State<MyCustomForm> {
  // Create a global key that uniquely identifies the Form widget
  // and allows validation of the form.
  final _formKey = GlobalKey<FormState>();

  @override
  Widget build(BuildContext context) {
    // Build a Form widget using the _formKey created above.
    return Form(
      key: _formKey,
      child: Column(
        crossAxisAlignment: CrossAxisAlignment.start,
        children: <Widget>[
          TextFormField(
            decoration: const InputDecoration(
              icon: const Icon(Icons.person),
              hintText: 'Enter your name',
              labelText: 'Name',
            ),
          ),
          TextFormField(
            decoration: const InputDecoration(
              icon: const Icon(Icons.phone),
              hintText: 'Enter a phone number',
              labelText: 'Phone',
            ),
          ),
          TextFormField(
            decoration: const InputDecoration(
            icon: const Icon(Icons.calendar_today),
            hintText: 'Enter your date of birth',
            labelText: 'Dob',
            ),
           ),
          new Container(
              padding: const EdgeInsets.only(left: 150.0, top: 40.0),
              child: new RaisedButton(
                child: const Text('Submit'),
                  onPressed: null,
              )),
        ],
      ),
    );
  }
}
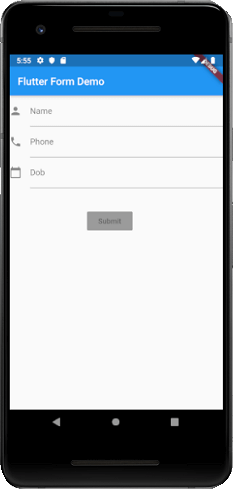
Output : Now, run the app, you can see the following screen in your Android Emulator. This form contains three field name, phone number, date of birth, and submit button.